Question # 1
Task 1
An administrator has been asked to configure a storage for a distributed application which
uses large data sets across multiple worker VMs.
The worker VMs must run on every node. Data resilience is provided at the application
level and low cost per GB is a Key Requirement.
Configure the storage on the cluster to meet these requirements. Any new object created
should include the phrase Distributed_App in the name.
|
Answer: See the Explanation for step by step solution.
Explanation:
To configure the storage on the cluster for the distributed application, you can follow these
steps:
Log in to Prism Element of cluster A using the credentials provided.
Go to Storage > Storage Pools and click on Create Storage Pool.
Enter a name for the new storage pool, such as Distributed_App_Storage_Pool, and select the disks to include in the pool. You can choose any combination of SSDs and HDDs, but
for low cost per GB, you may prefer to use more HDDs than SSDs.
Click Save to create the storage pool.
Go to Storage > Containers and click on Create Container.
Enter a name for the new container, such as Distributed_App_Container, and select the
storage pool that you just created, Distributed_App_Storage_Pool, as the source.
Under Advanced Settings, enable Erasure Coding and Compression to reduce the storage
footprint of the data. You can also disable Replication Factor since data resilience is
provided at the application level. These settings will help you achieve low cost per GB for
the container.
Click Save to create the container.
Go to Storage > Datastores and click on Create Datastore.
Enter a name for the new datastore, such as Distributed_App_Datastore, and select NFS
as the datastore type. Select the container that you just created,
Distributed_App_Container, as the source.
Click Save to create the datastore.
The datastore will be automatically mounted on all nodes in the cluster. You can verify this
by going to Storage > Datastores and clicking on Distributed_App_Datastore. You should
see all nodes listed under Hosts.
You can now create or migrate your worker VMs to this datastore and run them on any
node in the cluster. The datastore will provide low cost per GB and high performance for
your distributed application.
Question # 2
Task 2
An administrator needs to configure storage for a Citrix-based Virtual Desktop
infrastructure.
Two VDI pools will be created
Non-persistent pool names MCS_Pool for tasks users using MCS Microsoft Windows 10
virtual Delivery Agents (VDAs)
Persistent pool named Persist_Pool with full-clone Microsoft Windows 10 VDAs for power
users
20 GiB capacity must be guaranteed at the storage container level for all power user VDAs
The power user container should not be able to use more than 100 GiB
Storage capacity should be optimized for each desktop pool.
Configure the storage to meet these requirements. Any new object created should include
the name of the pool(s) (MCS and/or Persist) that will use the object.
Do not include the pool name if the object will not be used by that pool.
Any additional licenses required by the solution will be added later. |
Answer: See the Explanation for step by step solution.
Explanation:
To configure the storage for the Citrix-based VDI, you can follow these steps:
Log in to Prism Central using the credentials provided.
Go to Storage > Storage Pools and click on Create Storage Pool.
Enter a name for the new storage pool, such as VDI_Storage_Pool, and select the disks to
include in the pool. You can choose any combination of SSDs and HDDs, but for optimal
performance, you may prefer to use more SSDs than HDDs.
Click Save to create the storage pool.
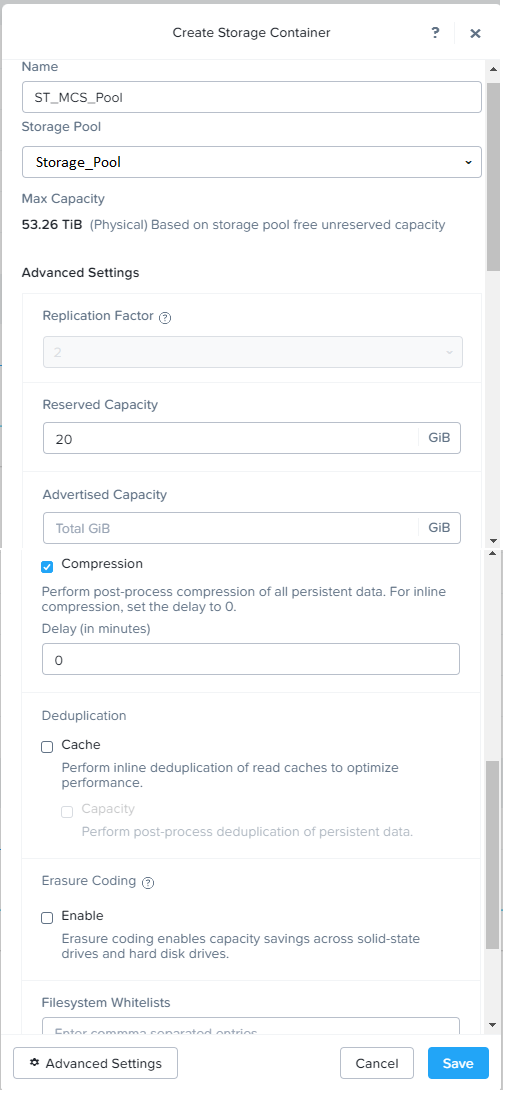
Go to Storage > Containers and click on Create Container.
Enter a name for the new container for the non-persistent pool, such as
MCS_Pool_Container, and select the storage pool that you just created,
VDI_Storage_Pool, as the source.
Under Advanced Settings, enable Deduplication and Compression to reduce the storage
footprint of the non-persistent desktops. You can also enable Erasure Coding if you have
enough nodes in your cluster and want to save more space. These settings will help you
optimize the storage capacity for the non-persistent pool.
Click Save to create the container.
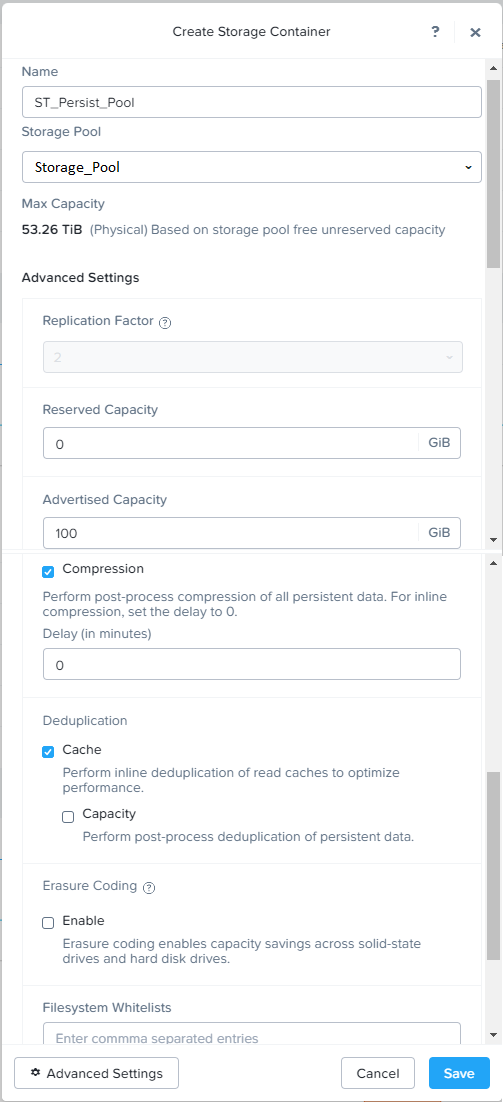
Go to Storage > Containers and click on Create Container again.
Enter a name for the new container for the persistent pool, such as
Persist_Pool_Container, and select the same storage pool, VDI_Storage_Pool, as the
source.
Under Advanced Settings, enable Capacity Reservation and enter 20 GiB as the reserved
capacity. This will guarantee that 20 GiB of space is always available for the persistent
desktops. You can also enter 100 GiB as the advertised capacity to limit the maximum
space that this container can use. These settings will help you control the storage
allocation for the persistent pool.
Click Save to create the container.
Go to Storage > Datastores and click on Create Datastore.
Enter a name for the new datastore for the non-persistent pool, such as
MCS_Pool_Datastore, and select NFS as the datastore type. Select the container that you
just created, MCS_Pool_Container, as the source.
Click Save to create the datastore.
Go to Storage > Datastores and click on Create Datastore again.
Enter a name for the new datastore for the persistent pool, such as
Persist_Pool_Datastore, and select NFS as the datastore type. Select the container that
you just created, Persist_Pool_Container, as the source.
Click Save to create the datastore.
The datastores will be automatically mounted on all nodes in the cluster. You can verify this
by going to Storage > Datastores and clicking on each datastore. You should see all nodes listed under Hosts.
You can now use Citrix Studio to create your VDI pools using MCS or full clones on these
datastores. For more information on how to use Citrix Studio with Nutanix Acropolis,
seeCitrix Virtual Apps and Desktops on NutanixorNutanix virtualization environments.
Question # 3
Task 14
The application team has requested several mission-critical VMs to be configured for
disaster recovery. The remote site (when added) will not be managed by Prism Central. As
such, this solution should be built using the Web Console.
Disaster Recovery requirements per VM:
Mkt01
RPO: 2 hours
Retention: 5 snapshots
Fin01
RPO: 15 minutes
Retention: 7 days
Dev01
RPO: 1 day
Retention: 2 snapshots
Configure a DR solution that meets the stated requirements.
Any objects created in this item must start with the name of the VM being protected.
Note: the remote site will be added later |
Answer: See the Explanation for step by step solution.
Explanation:
To configure a DR solution that meets the stated requirements, you can follow these steps:
Log in to the Web Console of the source cluster where the VMs are running.
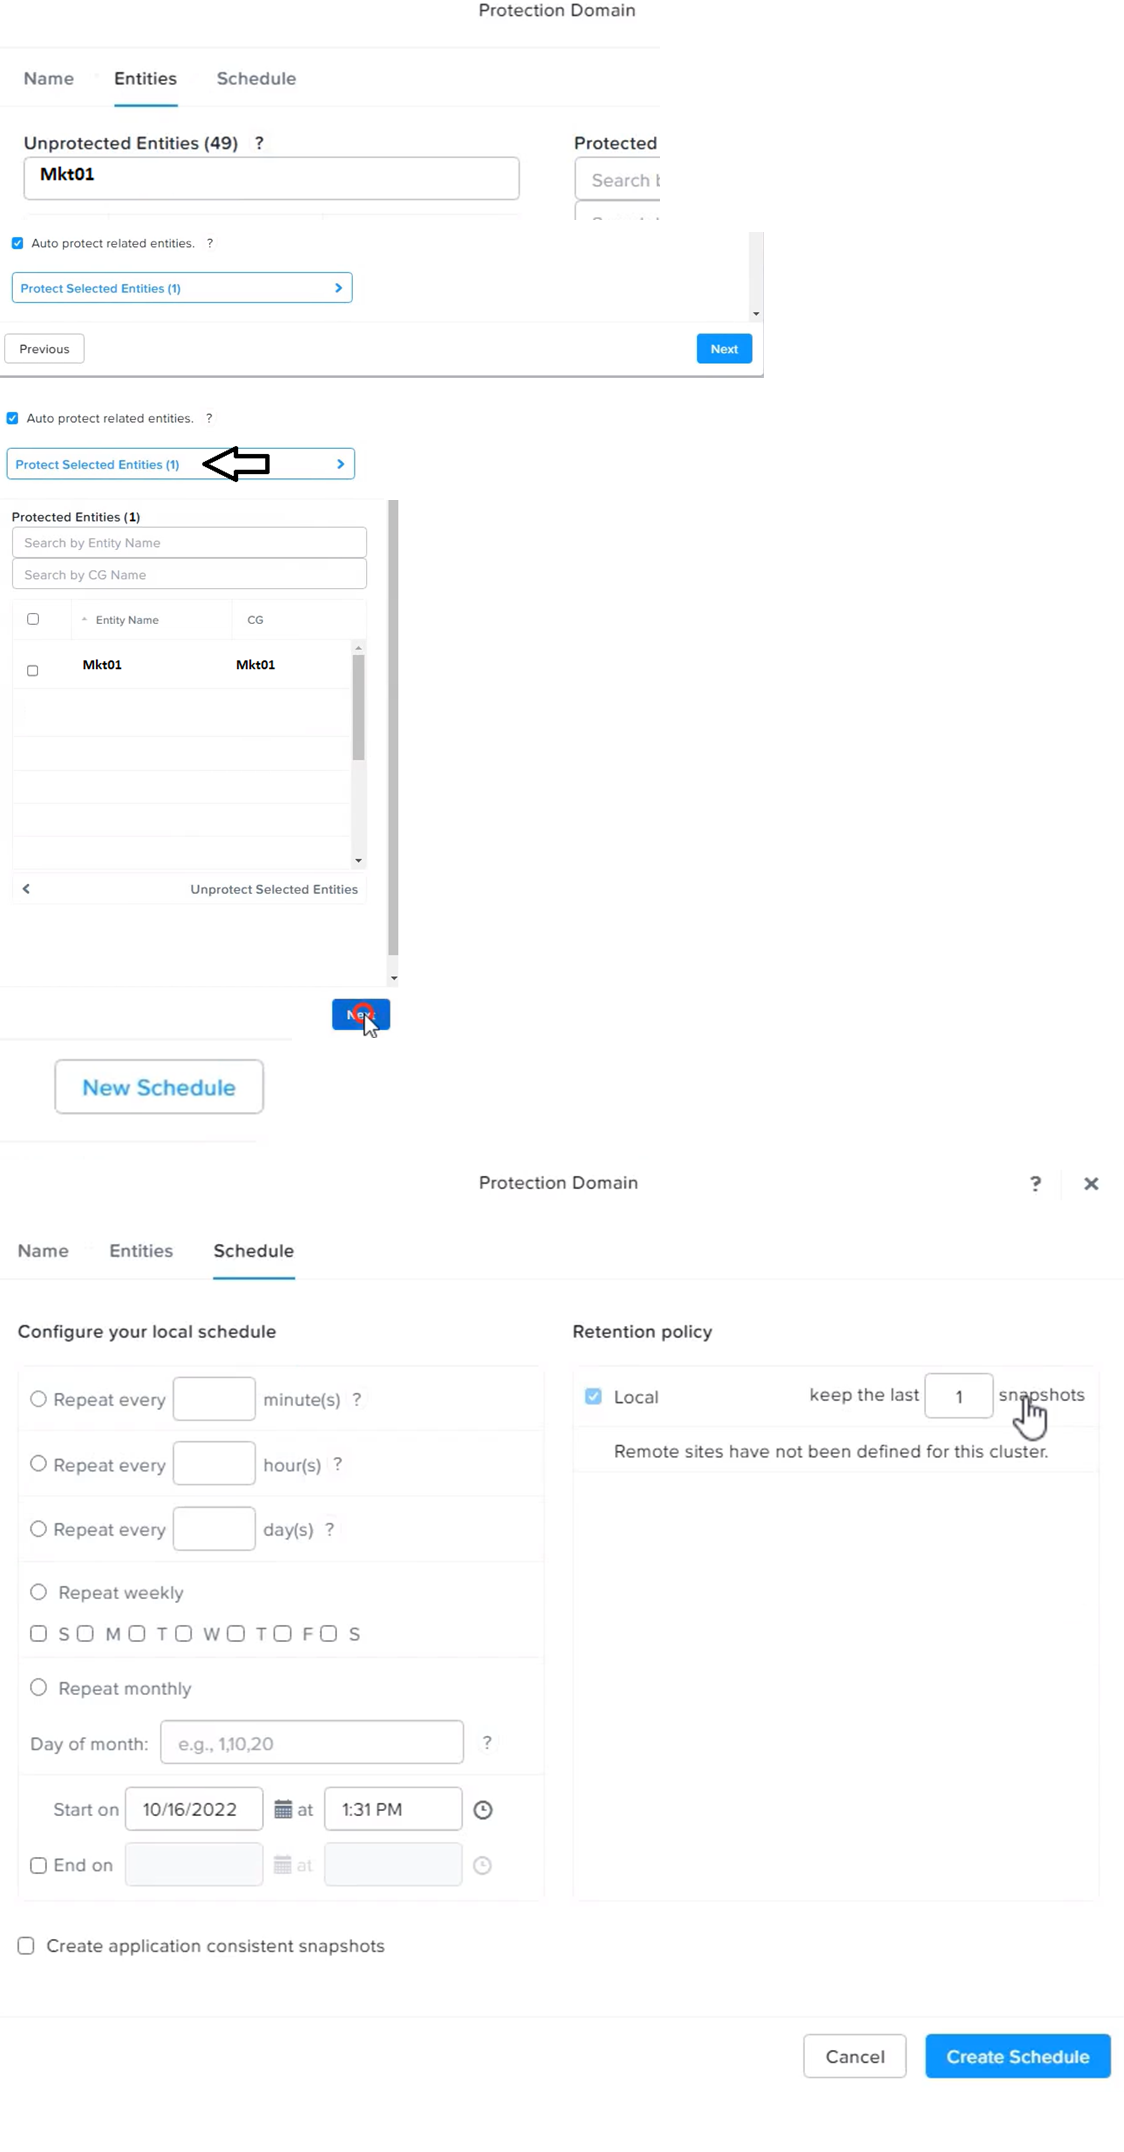
Click on Protection Domains on the left menu and click on Create Protection Domain.
Enter a name for the protection domain, such as PD_Mkt01, and a description if required.
Click Next.
Select Mkt01 from the list of VMs and click Next.
Select Schedule Based from the drop-down menu and enter 2 hours as the interval. Click
Next.
Select Remote Site from the drop-down menu and choose the remote site where you want
to replicate the VM. Click Next.
Enter 5 as the number of snapshots to retain on both local and remote sites. Click Next.
Review the protection domain details and click Finish.
Repeat the same steps for Fin01 and Dev01, using PD_Fin01 and PD_Dev01 as the
protection domain names, and adjusting the interval and retention values according to the
requirements.
Question # 4
Task 5
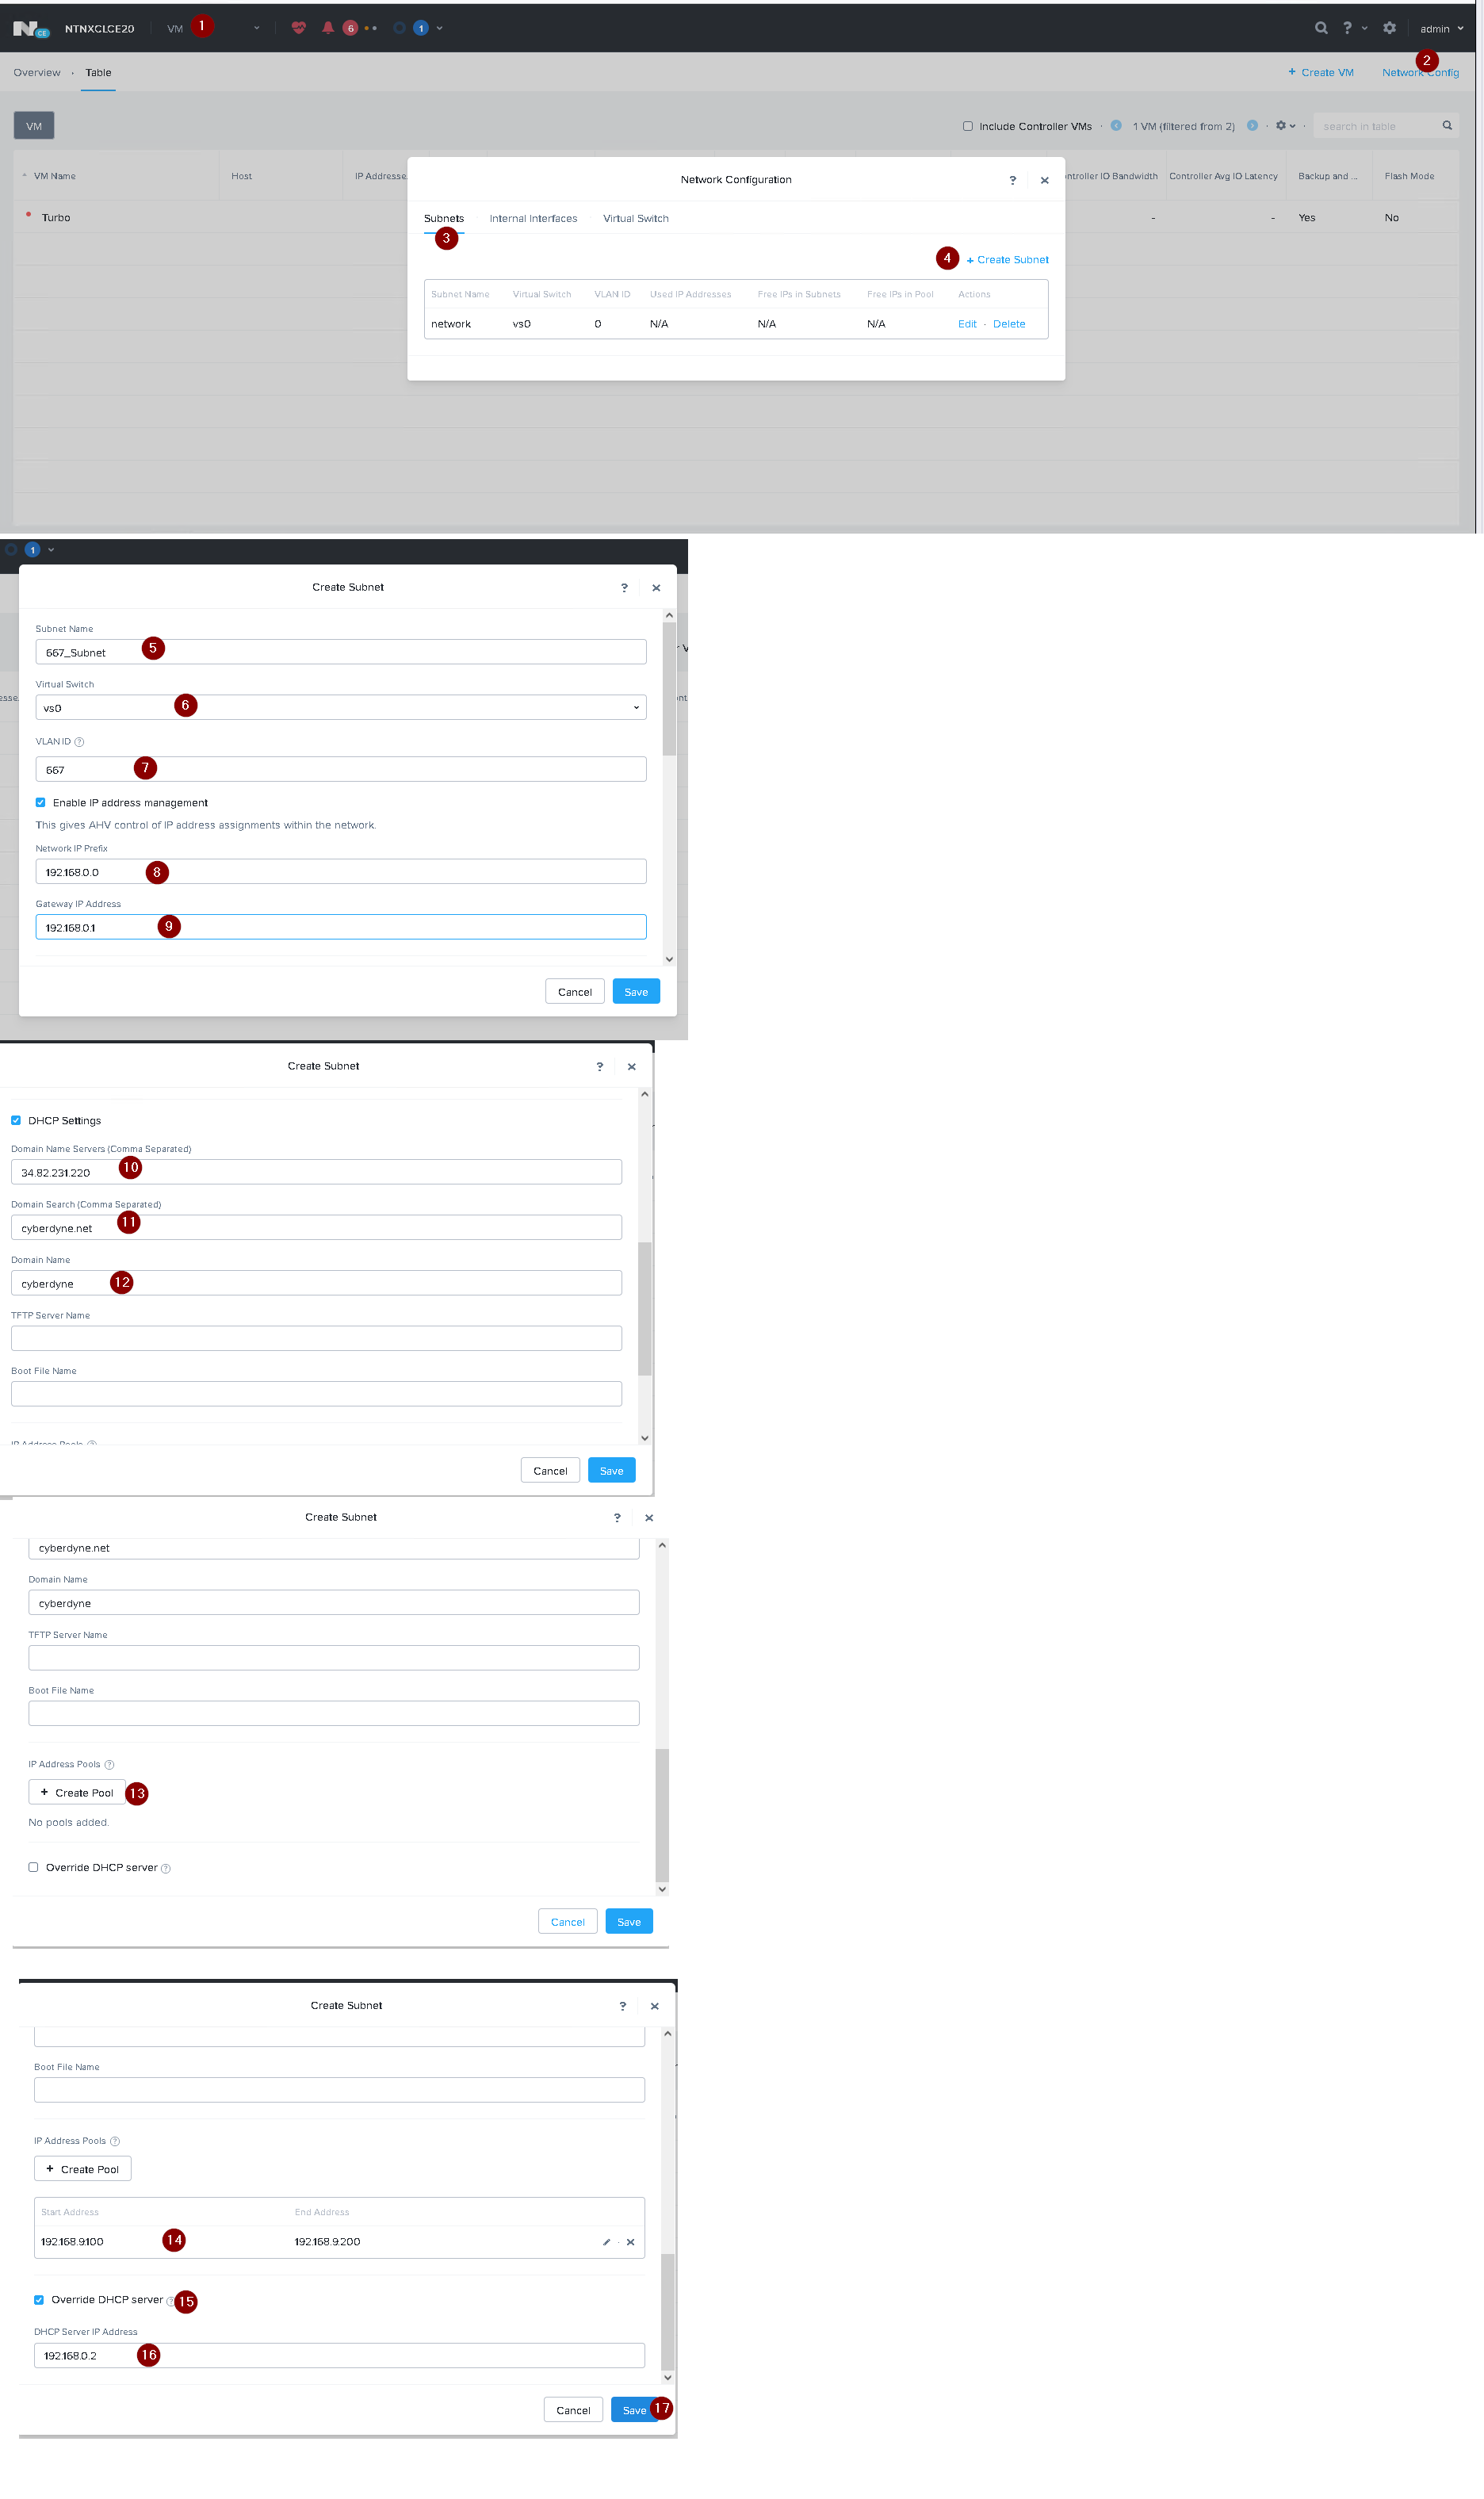
An administrator has been informed that a new workload requires a logically segmented
network to meet security requirements.
Network configuration:
VLAN: 667
Network: 192.168.0.0
Subnet Mask: 255.255.255.0
DNS server: 34.82.231.220
Default Gateway: 192.168.0.1
Domain: cyberdyne.net
IP Pool: 192.168.9.100-200
DHCP Server IP: 192.168.0.2
Configure the cluster to meet the requirements for the new workload if new objects are
required, start the name with 667. |
Answer: See the Explanation for step by step solution.
Explanation:
To configure the cluster to meet the requirements for the new workload, you need to do the
following steps:
Create a new VLAN with ID 667 on the cluster. You can do this by logging in to Prism
Element and going to Network Configuration > VLANs > Create VLAN. Enter 667 as the
VLAN ID and a name for the VLAN, such as 667_VLAN.
Create a new network segment with the network details provided. You can do this by
logging in to Prism Central and going to Network > Network Segments > Create Network
Segment. Enter a name for the network segment, such as 667_Network_Segment, and
select 667_VLAN as the VLAN. Enter 192.168.0.0 as the Network Address and
255.255.255.0 as the Subnet Mask. Enter 192.168.0.1 as the Default Gateway and
34.82.231.220 as the DNS Server. Enter cyberdyne.net as the Domain Name.
Create a new IP pool with the IP range provided. You can do this by logging in to Prism Central and going to Network > IP Pools > Create IP Pool. Enter a name for the IP pool,
such as 667_IP_Pool, and select 667_Network_Segment as the Network Segment. Enter
192.168.9.100 as the Starting IP Address and 192.168.9.200 as the Ending IP Address.
Configure the DHCP server with the IP address provided. You can do this by logging in to
Prism Central and going to Network > DHCP Servers > Create DHCP Server. Enter a
name for the DHCP server, such as 667_DHCP_Server, and select
667_Network_Segment as the Network Segment. Enter 192.168.0.2 as the IP Address and
select 667_IP_Pool as the IP Pool.
Question # 5
Task 8
Depending on the order you perform the exam items, the access information and
credentials could change. Please refer to the other item performed on Cluster B if you have
problems accessing the cluster.
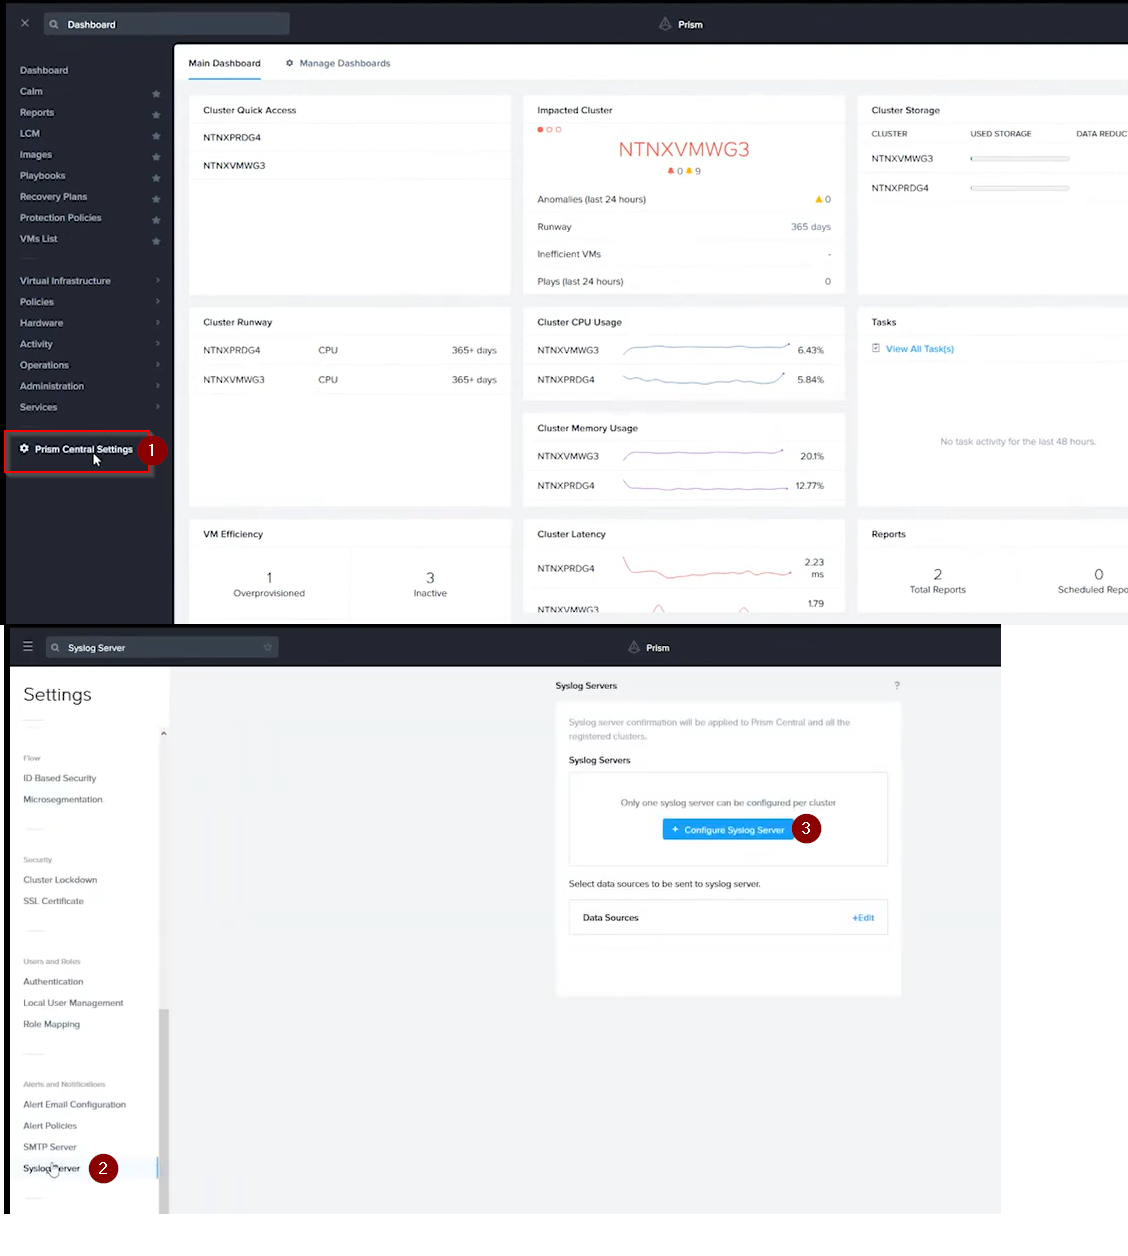
The infosec team has requested that audit logs for API Requests and replication
capabilities be enabled for all clusters for the top 4 severity levels and pushed to their
syslog system using highest reliability possible. They have requested no other logs to be
included.
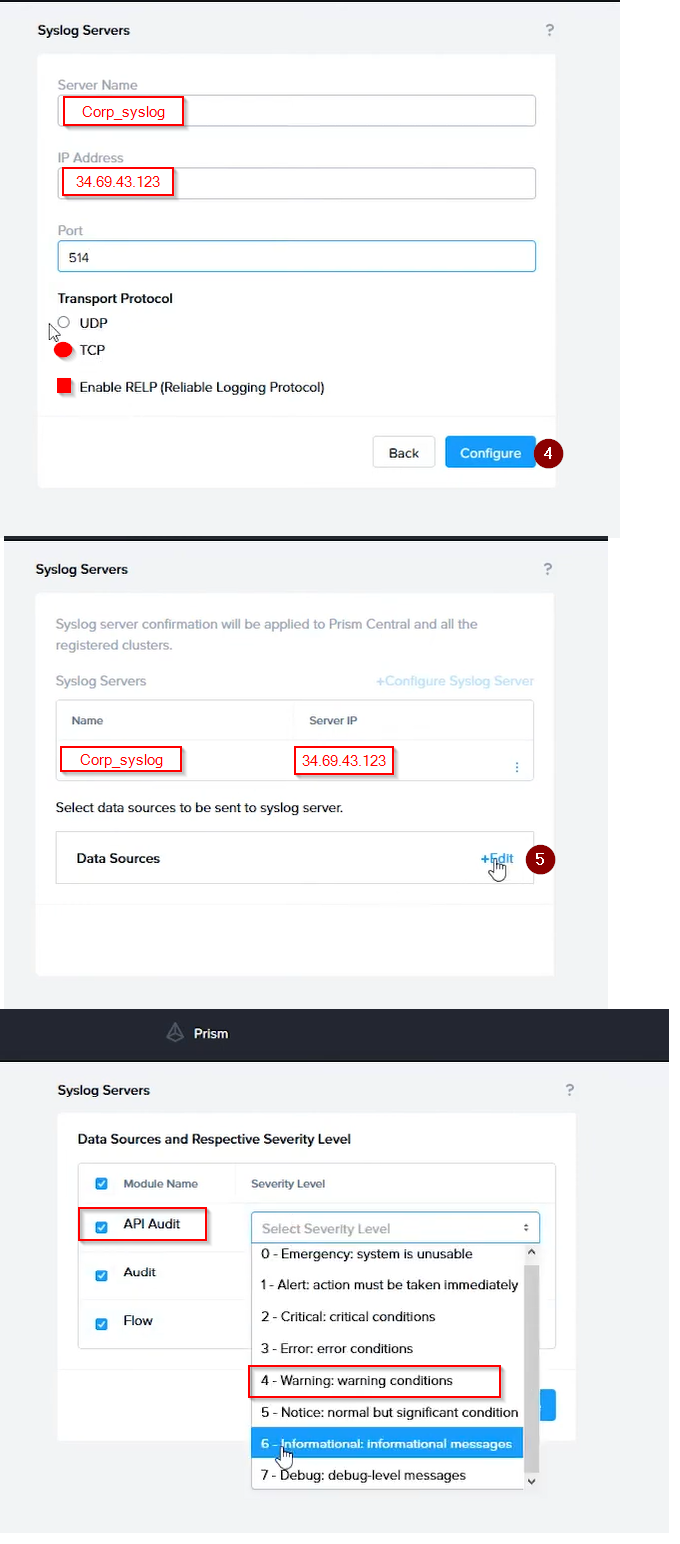
Syslog configuration:
Syslog Name: Corp_syslog
Syslop IP: 34.69.43.123
Port: 514
Ensure the cluster is configured to meet these requirements. |
Answer: See the Explanation for step by step solution.
Explanation:
To configure the cluster to meet the requirements of the infosec team, you need to do the
following steps:
Log in to Prism Central and go to Network > Syslog Servers > Configure Syslog Server.
Enter Corp_syslog as the Server Name, 34.69.43.123 as the IP Address, and 514 as the
Port. Select TCP as the Transport Protocol and enable RELP (Reliable Logging Protocol).
This will create a syslog server with the highest reliability possible.
Click Edit against Data Sources and select Cluster B as the cluster. Select API Requests
and Replication as the data sources and set the log level to CRITICAL for both of them.
This will enable audit logs for API requests and replication capabilities for the top 4 severity
levels (EMERGENCY, ALERT, CRITICAL, and ERROR) and push them to the syslog
server. Click Save.
Repeat step 2 for any other clusters that you want to configure with the same requirements.
To configure the Nutanix clusters to enable audit logs for API Requests and replication
capabilities, and push them to the syslog system with the highest reliability possible, you
can follow these steps:
Log in to the Nutanix Prism web console using your administrator credentials.
Navigate to the "Settings" section or the configuration settings interface within Prism.
Locate the "Syslog Configuration" or "Logging" option and click on it.
Configure the syslog settings as follows:
Syslog Name: Enter "Corp_syslog" as the name for the syslog configuration.
Syslog IP: Set the IP address to "34.69.43.123", which is the IP address of the syslog
system.
Port: Set the port to "514", which is the default port for syslog.
Enable the option for highest reliability or persistent logging, if available. This ensures that
logs are sent reliably and not lost in case of network interruptions.
Save the syslog configuration.
Enable Audit Logs for API Requests:
In the Nutanix Prism web console, navigate to the "Cluster" section or the cluster
management interface.
Select the desired cluster where you want to enable audit logs.
Locate the "Audit Configuration" or "Security Configuration" option and click on it.
Look for the settings related to audit logs and API requests. Enable the audit logging
feature and select the top 4 severity levels to be logged.
Save the audit configuration.
Enable Audit Logs for Replication Capabilities:
In the Nutanix Prism web console, navigate to the "Cluster" section or the cluster
management interface.
Select the desired cluster where you want to enable audit logs.
Locate the "Audit Configuration" or "Security Configuration" option and click on it.
Look for the settings related to audit logs and replication capabilities. Enable the audit
logging feature and select the top 4 severity levels to be logged.
Save the audit configuration.
After completing these steps, the Nutanix clusters will be configured to enable audit logs for
API Requests and replication capabilities. The logs will be sent to the specified syslog
system with the highest reliability possible.
ncli
rsyslog-config set-status enable=false
rsyslog-config add-server name=Corp_Syslog ip-address=34.69.43.123 port=514
network-protocol=tdp relp-enabled=false
rsyslog-config add-module server-name= Corp_Syslog module-name=APLOS
level=INFO
rsyslog-config add-module server-name= Corp_Syslog module-name=CEREBRO
level=INFO
rsyslog-config set-status enable=true
Question # 6
Task 16
Running NCC on a cluster prior to an upgrade results in the following output
FAIL: CVM System Partition /home usage at 93% (greater than threshold, 90%) Identify the CVM with the issue, remove the fil causing the storage bloat, and check the
health again by running the individual disk usage health check only on the problematic
CVM do not run NCC health check
Note: Make sure only the individual health check is executed from the affected node |
Answer: See the Explanation for step by step solution.
Explanation:
To identify the CVM with the issue, remove the file causing the storage bloat, and check
the health again, you can follow these steps:
Log in to Prism Central and click on Entities on the left menu.
Select Virtual Machines from the drop-down menu and find the NCC health check output
file from the list. You can use the date and time information to locate the file. The file name
should be something like ncc-output-YYYY-MM-DD-HH-MM-SS.log.
Open the file and look for the line that says FAIL: CVM System Partition /home usage at
93% (greater than threshold, 90%). Note down the IP address of the CVM that has this
issue. It should be something like X.X.X.X.
Log in to the CVM using SSH or console with the username and password provided.
Run the command du -sh /home/* to see the disk usage of each file and directory under
/home. Identify the file that is taking up most of the space. It could be a log file, a backup
file, or a temporary file. Make sure it is not a system file or a configuration file that is
needed by the CVM.
Run the command rm -f /home/ to remove the file causing the storage bloat.
Replace with the actual name of the file.
Run the command ncc health_checks hardware_checks disk_checks disk_usage_check --
cvm_list=X.X.X.X to check the health again by running the individual disk usage health
check only on the problematic CVM. Replace X.X.X.X with the IP address of the CVM that
you noted down earlier.
Verify that the output shows PASS: CVM System Partition /home usage at XX% (less than
threshold, 90%). This means that the issue has been resolved.
#access to CVM IP by Putty
allssh df -h #look for the path /dev/sdb3 and select the IP of the CVM
ssh CVM_IP
ls
cd software_downloads
ls
cd nos
ls -l -h
rm files_name
df -h
ncc health_checks hardware_checks disk_checks disk_usage_check
Question # 7
Task4
An administrator will be deploying Flow Networking and needs to validate that the
environment, specifically switch vs1, is appropriately configured. Only VPC traffic should be
carried by the switch.
Four versions each of two possible commands have been placed in
Desktop\Files\Network\flow.txt. Remove the hash mark (#) from the front of correct First
command and correct Second command and save the file.
Only one hash mark should be removed from each section. Do not delete or copy lines, do
not add additional lines. Any changes other than removing two hash marks (#) will result in
no credit.
Also, SSH directly to any AHV node (not a CVM) in the cluster and from the command line
display an overview of the Open vSwitch configuration. Copy and paste this to a new text
file named Desktop\Files\Network\AHVswitch.txt.
Note: You will not be able to use the 192.168.5.0 network in this environment.
First command
#net.update_vpc_traffic_config virtual_switch=vs0
net.update_vpc_traffic_config virtual_switch=vs1
#net.update_vpc_east_west_traffic_config virtual_switch=vs0
#net.update_vpc_east_west_traffic_config virtual_switch=vs1
Second command
#net.update_vpc_east_west_traffic_config permit_all_traffic=true
net.update_vpc_east_west_traffic_config permit_vpc_traffic=true
#net.update_vpc_east_west_traffic_config permit_all_traffic=false
#net.update_vpc_east_west_traffic_config permit_vpc_traffic=false
|
Explanation:
First, you need to open the Prism Central CLI from the Windows Server 2019 workstation.
You can do this by clicking on the Start menu and typing “Prism Central CLI”. Then, you
need to log in with the credentials provided to you.
Second, you need to run the two commands that I have already given you in
Desktop\Files\Network\flow.txt. These commands are:
net.update_vpc_traffic_config virtual_switch=vs1 net.update_vpc_east_west_traffic_config
permit_vpc_traffic=true
These commands will update the virtual switch that carries the VPC traffic to vs1, and
update the VPC east-west traffic configuration to allow only VPC traffic. You can verify that
these commands have been executed successfully by running the command:
net.get_vpc_traffic_config
This command will show you the current settings of the virtual switch and the VPC eastwest
traffic configuration.
Third, you need to SSH directly to any AHV node (not a CVM) in the cluster and run the
command:
ovs-vsctl show
This command will display an overview of the Open vSwitch configuration on the AHV
node. You can copy and paste the output of this command to a new text file named
Desktop\Files\Network\AHVswitch.txt.
You can use any SSH client such as PuTTY or Windows PowerShell to connect to the AHV
node. You will need the IP address and the credentials of the AHV node, which you can find in Prism Element or Prism Central.
remove # from greens
On AHV execute:
sudo ovs-vsctl show
CVM access AHV access command
nutanix@NTNX-A-CVM:192.168.10.5:~$ ssh root@192.168.10.2 "ovs-vsctl show"
Open AHVswitch.txt and copy paste output
Nutanix NCM-MCI-6.5 Exam Dumps
5 out of 5
Pass Your Nutanix Certified Master - Multicloud Infrastructure (NCM-MCI)v6.5 Exam in First Attempt With NCM-MCI-6.5 Exam Dumps. Real NCM-MCI Exam Questions As in Actual Exam!
— 16 Questions With Valid Answers
— Updation Date : 28-Mar-2025
— Free NCM-MCI-6.5 Updates for 90 Days
— 98% Nutanix Certified Master - Multicloud Infrastructure (NCM-MCI)v6.5 Exam Passing Rate
PDF Only Price 49.99$
19.99$
Buy PDF
Speciality
Additional Information
Testimonials
Related Exams
- Number 1 Nutanix NCM-MCI study material online
- Regular NCM-MCI-6.5 dumps updates for free.
- Nutanix Certified Master - Multicloud Infrastructure (NCM-MCI)v6.5 Practice exam questions with their answers and explaination.
- Our commitment to your success continues through your exam with 24/7 support.
- Free NCM-MCI-6.5 exam dumps updates for 90 days
- 97% more cost effective than traditional training
- Nutanix Certified Master - Multicloud Infrastructure (NCM-MCI)v6.5 Practice test to boost your knowledge
- 100% correct NCM-MCI questions answers compiled by senior IT professionals
Nutanix NCM-MCI-6.5 Braindumps
Realbraindumps.com is providing NCM-MCI NCM-MCI-6.5 braindumps which are accurate and of high-quality verified by the team of experts. The Nutanix NCM-MCI-6.5 dumps are comprised of Nutanix Certified Master - Multicloud Infrastructure (NCM-MCI)v6.5 questions answers available in printable PDF files and online practice test formats. Our best recommended and an economical package is NCM-MCI PDF file + test engine discount package along with 3 months free updates of NCM-MCI-6.5 exam questions. We have compiled NCM-MCI exam dumps question answers pdf file for you so that you can easily prepare for your exam. Our Nutanix braindumps will help you in exam. Obtaining valuable professional Nutanix NCM-MCI certifications with NCM-MCI-6.5 exam questions answers will always be beneficial to IT professionals by enhancing their knowledge and boosting their career.
Yes, really its not as tougher as before. Websites like Realbraindumps.com are playing a significant role to make this possible in this competitive world to pass exams with help of NCM-MCI NCM-MCI-6.5 dumps questions. We are here to encourage your ambition and helping you in all possible ways. Our excellent and incomparable Nutanix Nutanix Certified Master - Multicloud Infrastructure (NCM-MCI)v6.5 exam questions answers study material will help you to get through your certification NCM-MCI-6.5 exam braindumps in the first attempt.
Pass Exam With Nutanix NCM-MCI Dumps. We at Realbraindumps are committed to provide you Nutanix Certified Master - Multicloud Infrastructure (NCM-MCI)v6.5 braindumps questions answers online. We recommend you to prepare from our study material and boost your knowledge. You can also get discount on our Nutanix NCM-MCI-6.5 dumps. Just talk with our support representatives and ask for special discount on NCM-MCI exam braindumps. We have latest NCM-MCI-6.5 exam dumps having all Nutanix Nutanix Certified Master - Multicloud Infrastructure (NCM-MCI)v6.5 dumps questions written to the highest standards of technical accuracy and can be instantly downloaded and accessed by the candidates when once purchased. Practicing Online NCM-MCI NCM-MCI-6.5 braindumps will help you to get wholly prepared and familiar with the real exam condition. Free NCM-MCI exam braindumps demos are available for your satisfaction before purchase order.
Send us mail if you want to check Nutanix NCM-MCI-6.5 Nutanix Certified Master - Multicloud Infrastructure (NCM-MCI)v6.5 DEMO before your purchase and our support team will send you in email.
If you don't find your dumps here then you can request what you need and we shall provide it to you.
Bulk Packages
$50
- Get 3 Exams PDF
- Get $33 Discount
- Mention Exam Codes in Payment Description.
Buy 3 Exams PDF
$70
- Get 5 Exams PDF
- Get $65 Discount
- Mention Exam Codes in Payment Description.
Buy 5 Exams PDF
$100
- Get 5 Exams PDF + Test Engine
- Get $105 Discount
- Mention Exam Codes in Payment Description.
Buy 5 Exams PDF + Engine
 Jessica Doe
NCM-MCI
We are providing Nutanix NCM-MCI-6.5 Braindumps with practice exam question answers. These will help you to prepare your Nutanix Certified Master - Multicloud Infrastructure (NCM-MCI)v6.5 exam. Buy NCM-MCI NCM-MCI-6.5 dumps and boost your knowledge.
| 